The Ultimate 7 Day Utah National Parks Road Trip Itinerary

Planning a road trip to Utah’s national parks?  The Ultimate 7 Day Utah National Parks Road Trip Itinerary follows a simple loop from Salt Lake City and takes you through Zion, Bryce Canyon, Capitol Reef, Arches, and Canyonlands. The route is easy to follow.

You’ll spend more time in Zion and Arches, with shorter, scenic stops at Bryce Canyon, Capitol Reef, and Canyonlands before heading back to Salt Lake City. It’s paced well, so you can see a lot without feeling like you’re always in the car.

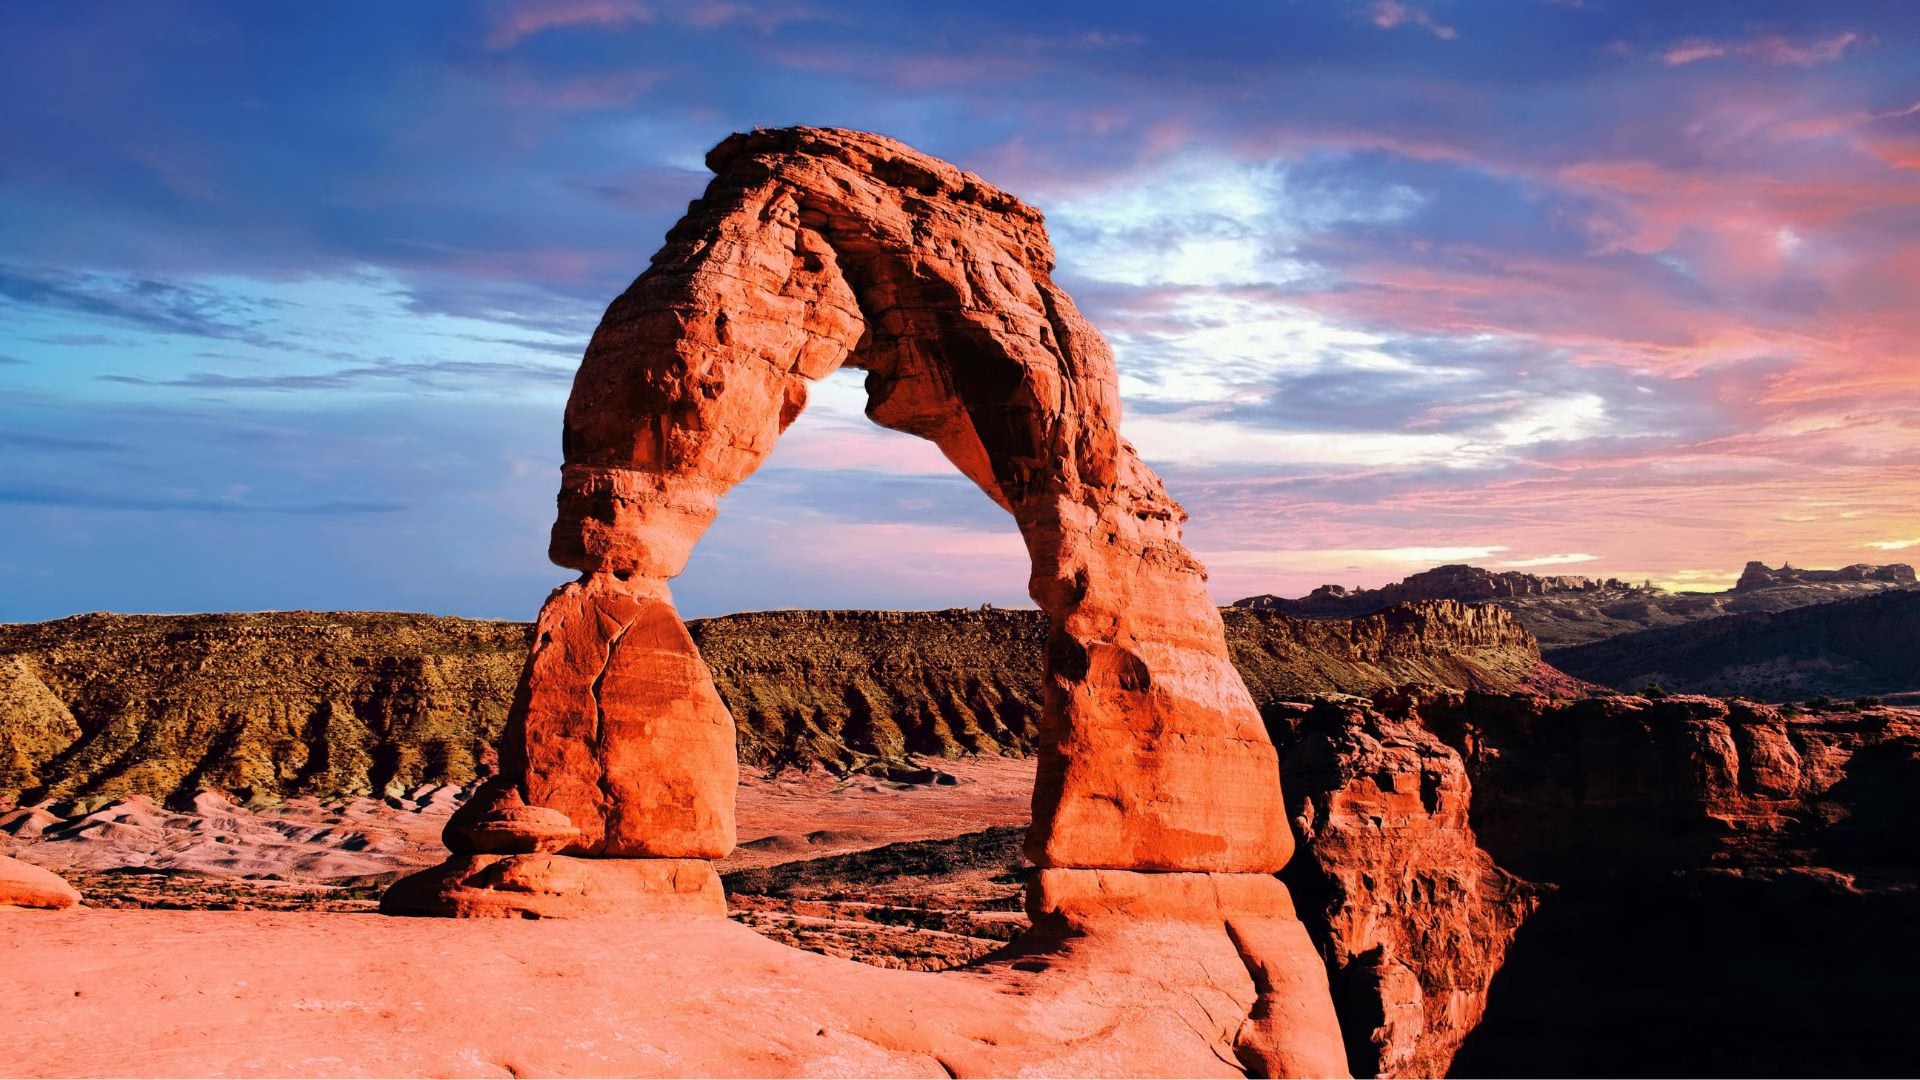
Utah’s parks really are some of the best in the Southwest. Expect big canyons, strange rock shapes, wide open views, natural arches, classic hikes, and drives that make you pull over again and again. Each park feels different, and that mix is what makes the trip so much fun.

Disclaimer: This post may contain affiliate links. We may earn a commission if you purchase through these links, at no extra cost to you.

Where to Start Your Utah National Parks Road Trip

The best place to start this 7-day Utah national parks road trip is Salt Lake City. It’s Utah’s largest city and the easiest place to fly into, with plenty of domestic and international flights that are often reasonably priced.

Plan to fly into Salt Lake City International Airport and try to arrive in the morning. That gives you enough time to pick up your rental car and start the drive to your first stop, Zion National Park, without feeling rushed.

Before you really get into the trip, here’s a tip that can save you a lot of money. Consider buying the America the Beautiful annual park pass. It costs $80 and gives you access to all national parks across the United States for a full year.

Best 7-Day Utah National Parks Road Trip: The Mighty 5


Day 1: From Salt Lake City to Zion National Park

Scenic Drive Through Zion National Park Utah

Day one starts in Salt Lake City and heads straight toward Zion. It’s a longer drive, so today is more about the journey than the sights, easing you into the rhythm of the road trip.

Zion National Park sits about 300 miles from Salt Lake City, which works out to roughly a four and a half hour drive. Most of the route follows Interstate 15, and the drive itself isn’t boring at all, with changing scenery and a few interesting spots you can stop at along the way.

By the afternoon, you’ll arrive in Springdale, the small town right outside Zion and the main gateway to the park. Check into your hotel, take a short break, and then head out for some easy exploring.

Start with a relaxed walk along the Virgin River or hop onto the Pa’rus Trail. It’s an easy, flat trail with great views and a perfect way to get your first feel for Zion without doing anything too strenuous on day one.

Night Stay: Springdale


Day 2: A Full Day Exploring Zion National Park

Breathtaking View of Zion National Park Canyon

Today is all about Zion National Park, one of the most well-known parks in the country. The park is known for its massive cliffs, narrow slot canyons, and some of the most famous hikes in the Southwest.

Start the day with Zion’s most famous hike, and make sure you get to the park early. Parking fills up quickly, so please arrive as soon as possible. Then, head to the Visitor Center and board the shuttle. Get off at stop number 6, The Grotto. From there, cross the road, walk over the bridge, and turn right to join the West Rim Trail.

Scout Lookout & Angel’s Landing

Scout Lookout is part of the longer West Rim Trail and is a popular turnaround point for many hikers. This section is about 3.6 miles round trip with roughly 1,100 feet of elevation gain and usually takes around two and a half hours.

The hike starts fairly easy, but it gets tougher as you climb, especially when you reach the tight switchbacks known as Walter’s Wiggles. The views at Scout Lookout make the effort worth it.

If you’re feeling up for more and have a permit, you can continue from Scout Lookout to Angel’s Landing. This adds more distance and difficulty, but it’s one of the most famous hikes in the park.

Just keep in mind that the Angel’s Landing section requires a permit, which you’ll need to apply for through the National Park Service lottery.

The Riverside Walk & The Narrows

In the afternoon, consider hiking the Narrows, which is easily one of Zion’s most unique experiences. Take the shuttle to stop number 9, Temple of Sinawava. From there, you’ll walk the Riverside Walk and then step straight into the river.

The hike follows the water through narrow slot canyons, heading toward Big Springs before turning back. The distance to Big Springs is about 8.9 miles round trip, plus the extra 0.9 miles from the Riverside Walk.

You don’t have to go the full distance to enjoy it, but if you plan to hike past Big Springs, you’ll need a permit.

Zion Scenic Drive

In the late afternoon, if you still have some energy, take it easy with a ride along the Zion Scenic Drive on the shuttle. The road is about 8 miles long and is the same route you use to reach most of the trailheads.

Night Stay: Springdale


Day 3: Zion to Bryce Canyon – Scenic Drive & Viewpoints

sunset at bryce canyon

Today you’ll spend some time in Zion National Park, then start making your way toward Bryce Canyon National Park. The drive takes about 2 to 2.5 hours and is a really scenic stretch through southern Utah, with changing landscapes along the way.

Zion-Mount Carmel Highway Drive

Start your day with a drive along the Zion–Mount Carmel Highway. You’ll pass through the Zion Tunnel and come across several roadside pullouts along the way. It’s an easy way to enjoy some great views and grab a few quick photos, with no hiking needed.

Depart Zion for Bryce Canyon

Leave Zion by late morning and start the drive toward Bryce Canyon National Park. You can stop for lunch along the way in places like Mount Carmel Junction or Orderville. Once you arrive at Bryce Canyon, head straight into the park for some light exploring and your first views of the area.

Bryce Canyon Scenic Drive & Viewpoints

Today is all about taking it easy, so focus on viewpoints only and skip any long hikes. Bryce Canyon is perfect for this, since many of the best views are right off the road or just a short walk from the parking area.

Sunset Point is definitely worth stopping at, especially if you’re here later in the day. The walk from the parking lot is very short, only about 500 feet, so it’s easy for just about everyone.

Inspiration Point is another great stop, and it’s only about eight minutes down the road from Sunrise Point. This viewpoint gives you a wide look over the Bryce Amphitheater, and honestly, the landscape almost doesn’t feel real. It’s one of those spots that really shows off how unique this place is.

About two miles south of Inspiration Point, you’ll find Bryce Point. It’s another great overlook with a wide view looking into the Bryce Amphitheater, which drops nearly 1,000 feet below. It’s a quick stop, but the view is impressive and well worth pulling over for.

Night Stay: Bryce Canyon City


Day 4: Bryce Canyon Highlights & Scenic Drive to Capitol Reef

Natural Arch in Bryce Canyon in Utah


Today you’ll start with a hike on one of Bryce Canyon’s most popular trails, the Queen’s Garden Trail. It’s a great way to see the hoodoos up close without being too long or exhausting.

After the hike, begin the scenic drive from Bryce Canyon to Capitol Reef. The route itself is part of the experience, with changing landscapes along the way.

Once you arrive at Capitol Reef, spend some time exploring a few of the park’s highlights and getting your first feel for this quieter, less crowded park.

Queen’s Garden Trail

From Sunset Point, it’s easy to connect to the Queen’s Garden Trail. The trail drops about 450 feet as it winds down into the canyon. Take your time on the way down, since parts of the path have loose gravel and can feel a bit slippery.

One of the cool things about Bryce Canyon is how quickly everything changes as you descend. The air feels different, the colors shift, and suddenly you’re surrounded by tall, pointy hoodoos that almost look like the tops of old buildings or towers. This area at the bottom is known as Queen’s Garden, and it really feels like stepping into another world.

The trail does continue past Queen’s Garden, but if you’re not planning a longer hike, it’s best to turn around after crossing the last footbridge. Keep in mind that hiking back up is tougher than the walk down, especially at around 8,000 feet.

If you’re feeling strong and want more of a challenge, you can connect to the Navajo Loop Trail and keep going.

Drive to Capitol Reef (Highway 12)

After you’re done exploring the Queen’s Garden Trail, it’s time to hit the road and head toward Capitol Reef. You’ll take Highway 12, and the drive usually takes around 3 to 3.5 hours.

Highway 12 is easily one of the highlights of the entire trip. The scenery changes constantly, and there are plenty of spots that make you want to slow down and look around. Plan to stop for lunch along the way in Escalante or Boulder, both are easy places to take a break before finishing the drive to Capitol Reef.

Explore Capitol Reef Viewpoints

Panorama Point is an easy stop just off Highway 24 and gives you great views right from the parking lot, so there’s no hiking involved. It’s a nice first look at Capitol Reef and a good place to take in the wide landscape without much effort.

A little farther down the road, you’ll reach Goosenecks Overlook. It’s only a short walk from the parking area and looks down into Sulphur Creek as it winds through the canyon below.

To wrap up the day, head to Sunset Point. The short 0.6-mile round-trip walk leads to one of the best sunset spots in the park, with views over Waterpocket Fold and the Sulphur Creek Gorge. It’s a calm, scenic way to end the day in Capitol Reef.

Night Stay: Torrey


Entrance to Capitol Reef National Park in Utah

Today starts with a half day in Capitol Reef National Park, giving you time to see a few highlights without rushing. After that, you’ll drive east toward Moab, the small town that serves as the main base for visiting Arches National Park. It’s a nice mix of park time and road time to ease into the next part of the trip.

Drive the Capitol Reef Scenic Drive

Start your day with a drive along the Capitol Reef Scenic Drive. It’s about 8 miles long, and even if you don’t stop much, the views from the road alone are worth it.

There are a few pullouts and short stops along the way if you want to stretch your legs, but simply driving through is enough to get a real feel for the park. For many people, this ends up being one of the favorite parts of Capitol Reef.

Explore Fruita

Fruita is a small historic area right inside Capitol Reef National Park and is home to the Gifford Homestead. This is a great place to stop, especially if you’re hungry. The homestead is known for its fresh pies and cinnamon rolls, and they’re definitely worth trying if they’re available.

After grabbing a treat, take a short walk around the area and look at the old buildings and orchards. It’s a simple stop, but it gives you a nice glimpse into how early settlers lived here in the late 1800s.

Drive to Arches National Park (Moab)

After you’re done exploring Capitol Reef, start the drive toward Arches National Park. The drive usually takes about two and a half to three hours, and the scenery slowly changes from red cliffs to wide, open desert mesas along the way.

Once you reach Moab, check into your hotel and get settled. This is a good time to relax a bit before heading out again or saving your energy for a full day in Arches tomorrow.

Night Stay: Moab

💡Pro-Tip: Some of Moab’s most impressive arches and prehistoric dinosaur tracks lie along rugged backcountry routes that standard rental cars cannot access. Booking the Hell’s Revenge 4×4 Hummer Adventure is a great way to reach these hidden areas safely while enjoying thrilling off-road views over Arches National Park and the Colorado River without tackling long, hot desert hikes.


Day 6: Explore Arches National Park

Delicate Arch


Today is all about Arches National Park, so plan to arrive early. Try to get to the park before 7 am, which means you won’t need a timed entry permit. Since Arches is only about five miles from Moab, the early start isn’t too bad.

For most of the year, sunrise is around 7 am or earlier, so you’ll be getting there right as the light starts to hit the rocks. In winter, sunrise is a bit later, closer to 7:30 am, but it’s still worth starting the day early to enjoy the park while it’s quieter.

Delicate Arch Hike

The Delicate Arch hike is the one everyone talks about in Arches, and for good reason. This is the arch you see on Utah’s license plates, so it’s kind of a must while you’re here. The hike is about 3 miles round trip, but don’t let the distance fool you.

It’s mostly uphill on the way out, with very little shade, which is why it’s rated as difficult. Bring water and take your time. Even with the effort, it’s absolutely worth it.

Delicate Arch is an amazing place to be, especially at sunrise. Most visitors hike up for sunset, so going early in the morning is a great way to avoid the crowds and enjoy the arch in a quieter, more peaceful setting.

Windows Section

Another short but really rewarding stop is the Windows section of the park. This area has a high number of arches packed into one place, and you don’t have to hike much to see them. Balanced Rock is also right here, so it’s easy to add this stop without much effort.

You can see a lot just by pulling into the parking area, but it’s worth walking around a bit. Some of the arches are close enough that you can hike right up to them, and in a couple of spots, you can even walk through them. It’s a fun area to explore without taking up too much time or energy.

After that, if you still have some energy left, make a quick stop at the Park Avenue Viewpoint. It doesn’t take long, but the views are worth it and give you one last look at the park.

Once you’re done, head back to Moab for dinner. It’s a good chance to relax, grab a meal, and wind down after a full day of exploring Arches.

Night Stay: Moab

💡Pro-Tip: Arches National Park requires a Timed Entry Permit during peak season, which often sells out well in advance. Booking an Arches National Park Guided Sightseeing Tour guarantees entry through an authorized operator and removes the hassle of parking at busy areas like the Windows Section and Delicate Arch trailhead.


Day 7: Canyonlands Island in the Sky: Half-Day Visit & Drive to Salt Lake City

Mesa Arch

Today you’ll head out to explore Canyonlands National Park, focusing on the Island in the Sky district. The drive from Moab takes about 45 minutes and is easy, with some nice views along the way.

Island in the Sky is one of those places that really surprises you. Wide canyons, layered cliffs, and big open views stretch out in every direction, and most viewpoints are just a short walk from the parking areas.

After spending some time here, you’ll start the drive back to Salt Lake City, bringing your Utah road trip to a close.

Mesa Arch

Start the day at Mesa Arch, which is easily the most popular stop in Canyonlands National Park. The walk to the arch is short, about 0.8 miles round trip, and usually takes 15 to 30 minutes. The trail is marked with cairns and is fairly easy, with just a few small hills and rocky sections along the way.

Mesa Arch sits right on the edge of a cliff and looks out over Buck Canyon, with views of Monster Tower and, on clear days, the La Sal Mountains in the distance.

A lot of people consider this the best view in the park, and it’s easy to see why. Sunrise is the busiest time to visit, when the light shines through the arch and creates that famous glow underneath.

Grand View Point

After Mesa Arch, make your way to Grand View Point, another must-see stop in the Island in the Sky area. This viewpoint is easy to visit since you can enjoy the views right from the parking lot without any hiking.

If you feel like stretching your legs a bit, you can also walk the Grand View Point Trail. It’s an easy out-and-back trail, about 2 miles total, and takes around 1 to 1.5 hours.

The views along the way are wide and open, looking out over layers of canyons that seem to go on forever. It’s a simple hike, but the scenery makes it well worth the time.

After you’re done at Canyonlands, head back toward Moab for lunch, or grab something along the highway if you want to get an early start. Once you’re ready, begin the drive back to Salt Lake City. The drive usually takes about 4 to 4.5 hours and marks the final stretch of your Utah road trip.

Where to Stay

These hotel recommendations are based on my top picks for this itinerary. I chose them to help you reduce travel time each day and stay comfortable, with options for every budget, from good value stays to more luxurious hotels.

Top Hotel Recommendations

1. Day 1 & Day 2 Springdale

2. Day 3 Bryce Canyon City

3. Day 4 Torrey

  • Budget-Friendly Stay: Motel Torrey – Clean, quiet, and great value
  • Premium Stay: Capitol Reef ResortComfortable lodge-style resort close to Capitol Reef NP

4. Day 5 & Day 6 Moab

  • Budget-Friendly Stay: Moab Valley InnGreat value, comfortable, and central.
  • Premium Stay: Hyatt Place Moab – Stylish, well-reviewed, excellent service.

What to plan and book for your Utah national parks road trip

Flights — Trip.com helps you compare and book flights into Salt Lake City International Airport, the easiest gateway for starting this Utah national parks road trip.

Car rental — DiscoverCars makes it simple to rent a vehicle at the airport so you can explore Zion, Bryce Canyon, Capitol Reef, Arches, and Canyonlands at your own pace.

Hotels — Booking.com helps you find available hotels and lodges in Springdale, Bryce Canyon City, Torrey, and Moab, especially during peak season when rooms sell out quickly.

Connectivity — Saily eSIM keeps maps, park navigation, and reservation details accessible even in remote desert areas with weak signal.

Travel insurance — SafetyWing provides coverage for hiking, long drives, and outdoor activities across remote national park regions.


FAQS

1. How many days do you need for Utah?

If you want an excellent experience in the national parks, it’s best to plan for at least a week. You can do this trip in about five days, but that means moving fast and not spending much time in each park. On the flip side, you could easily stretch it to two weeks and still feel like there’s more to see.

2. What is the best month to travel to Utah?

The best times to visit Utah’s national parks are usually in the spring, around April and May, or in the fall, from September to October. During these months, the weather is cooler, the crowds are smaller, and hiking is much more comfortable. These shoulder seasons make it easier to enjoy the parks without the intense heat or peak crowds you see in summer.

3. What is the most beautiful drive through Utah?

Highway 12, especially the stretch from Panguitch to Torrey, is often called the most beautiful drive in Utah, and it really lives up to that name. The road winds through narrow canyons, red rock towers, pine forests, and small pioneer towns, with the scenery changing every few miles.

After wrapping up your The Ultimate 7 Day Utah National Parks Road Trip Itinerary, if you’re looking for more great routes and travel ideas across the USA and Canada, be sure to check out these other itineraries.

To know more about Utah National Parks, Visit